Download this project-->SampleFIntegration.zip
strings.xml:
<?xml version="1.0" encoding="utf-8"?>
<resources>
<string name="app_name">SampleFBIntegration</string>
<string name="hello_world">Hello world!</string>
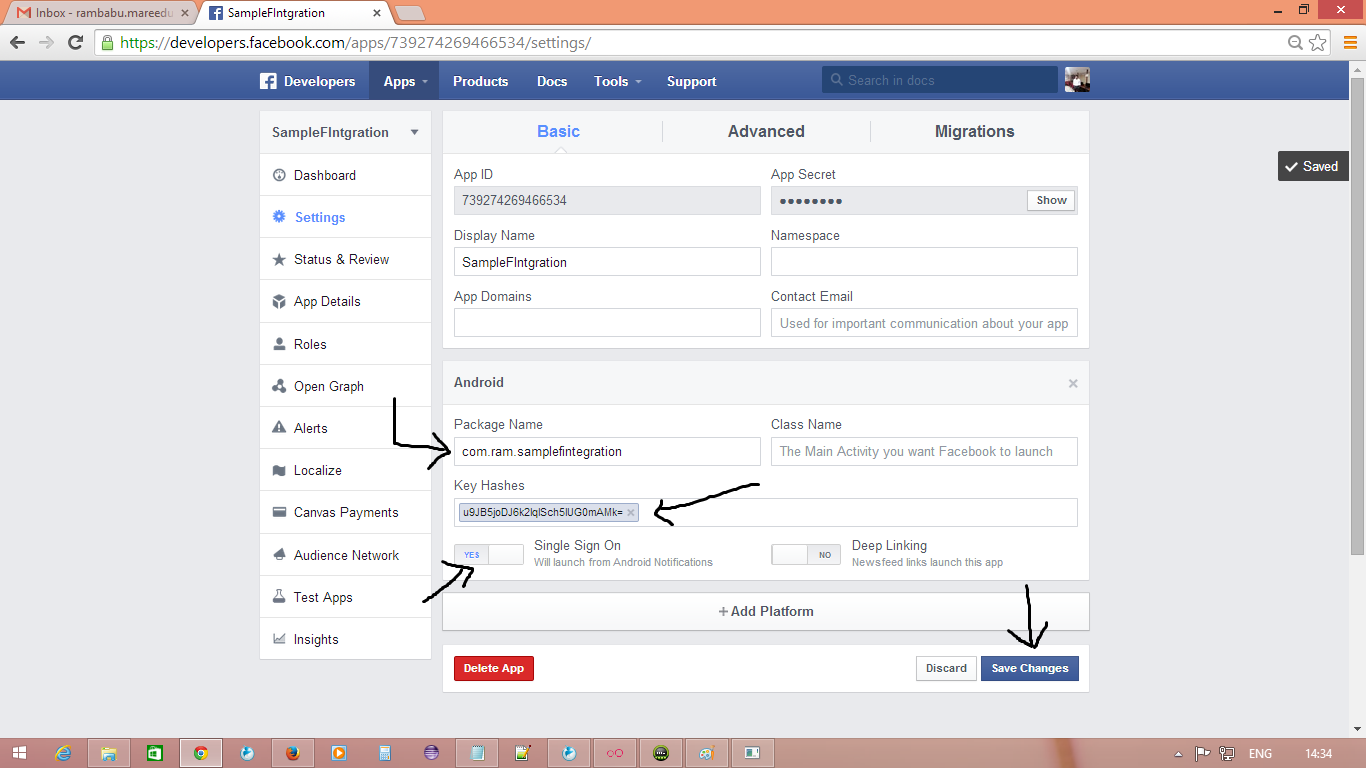
<string name="app_id">739274269466534</string>
</resources>
AndroidManifest.xml:
<?xml version="1.0" encoding="utf-8"?>
<manifest xmlns:android="http://schemas.android.com/apk/res/android"
package="com.ram.samplefintegration"
android:versionCode="1"
android:versionName="1.0" >
<uses-sdk
android:minSdkVersion="8"
android:targetSdkVersion="21" />
<uses-permission android:name="android.permission.INTERNET" />
<application
android:allowBackup="true"
android:icon="@drawable/ic_launcher"
android:label="@string/app_name"
android:theme="@style/AppTheme" >
<activity
android:name=".MainActivity"
android:label="@string/app_name" >
<intent-filter>
<action android:name="android.intent.action.MAIN" />
<category android:name="android.intent.category.LAUNCHER" />
</intent-filter>
</activity>
<meta-data
android:name="com.facebook.sdk.ApplicationId"
android:value="@string/app_id" />
<activity android:name="com.facebook.LoginActivity" />
</application>
</manifest>
main.xml:
<RelativeLayout xmlns:android="http://schemas.android.com/apk/res/android"
xmlns:tools="http://schemas.android.com/tools"
android:layout_width="match_parent"
android:layout_height="match_parent"
tools:context="${relativePackage}.${activityClass}" >
<Button
android:id="@+id/button_login"
android:layout_width="wrap_content"
android:layout_height="wrap_content"
android:layout_alignParentTop="true"
android:layout_centerHorizontal="true"
android:layout_marginTop="20dp"
android:text="Login" />
<TextView
android:id="@+id/textView"
android:layout_width="wrap_content"
android:layout_height="wrap_content"
android:layout_below="@+id/button_login"
android:layout_centerHorizontal="true"
android:layout_marginTop="10dp"
android:text="Welcome"
android:textAppearance="?android:attr/textAppearanceLarge" />
<Button
android:id="@+id/button_postStatus"
android:layout_width="wrap_content"
android:layout_height="wrap_content"
android:layout_below="@+id/textView"
android:layout_centerHorizontal="true"
android:layout_marginTop="20dp"
android:text="Post Status" />
<Button
android:id="@+id/button_postImage"
android:layout_width="wrap_content"
android:layout_height="wrap_content"
android:layout_alignRight="@+id/button_postStatus"
android:layout_below="@+id/button_postStatus"
android:layout_marginTop="20dp"
android:text="Post Image" />
</RelativeLayout>
MainActivity.java:
package com.ram.samplefintegration;
import java.util.Arrays;
import java.util.List;
import android.app.Activity;
import android.content.Intent;
import android.graphics.Bitmap;
import android.graphics.BitmapFactory;
import android.os.Bundle;
import android.util.Log;
import android.view.View;
import android.view.View.OnClickListener;
import android.widget.Button;
import android.widget.TextView;
import android.widget.Toast;
import com.facebook.Request;
import com.facebook.Response;
import com.facebook.Session;
import com.facebook.SessionState;
import com.facebook.UiLifecycleHelper;
import com.facebook.model.GraphUser;
public class MainActivity extends Activity implements OnClickListener
{
Button loginButton, postStatusButton;
Button postImageButton;
TextView text;
private static final List<String> PERMISSIONS = Arrays.asList("publish_actions");
private UiLifecycleHelper uiHelper;
Session fSession;
@Override
protected void onCreate(Bundle savedInstanceState)
{
super.onCreate(savedInstanceState);
setContentView(R.layout.main);
uiHelper = new UiLifecycleHelper(this, statusCallback);
uiHelper.onCreate(savedInstanceState);
text = (TextView) findViewById(R.id.textView);
loginButton = (Button) findViewById(R.id.button_login);
postStatusButton = (Button) findViewById(R.id.button_postStatus);
postImageButton = (Button) findViewById(R.id.button_postImage);
postImageButton.setOnClickListener(this);
loginButton.setOnClickListener(this);
postStatusButton.setOnClickListener(this);
if (Session.getActiveSession().isOpened())
{
Session.openActiveSession(this, true, statusCallback);
loginButton.setEnabled(false);
} else
{
buttonsDisable();
}
}
@Override
public void onClick(View v)
{
switch (v.getId())
{
case R.id.button_login:
// start facebook login
Session.openActiveSession(this, true, statusCallback);
break;
case R.id.button_postStatus:
// To post status to facebook
postStatusMessage("Hi to all....Sample status shared from android app");
break;
case R.id.button_postImage:
postImage();
break;
}
}
Session.StatusCallback statusCallback = new Session.StatusCallback()
{
@Override
public void call(Session session, SessionState state, Exception exception)
{
if (state.isOpened())
{
fSession = session;
getUserProfie();
} else
{
buttonsDisable();
}
}
};
@Override
public void onActivityResult(int requestCode, int resultCode, Intent data)
{
super.onActivityResult(requestCode, resultCode, data);
uiHelper.onActivityResult(requestCode, resultCode, data);
Session.getActiveSession().onActivityResult(this, requestCode, resultCode, data);
}
public void postStatusMessage(String message)
{
if (checkPermissions())
{
Request request = Request.newStatusUpdateRequest(fSession, message,
new Request.Callback()
{
@Override
public void onCompleted(Response response)
{
if (response.getError() == null)
Toast.makeText(MainActivity.this,
"Status updated successfully", Toast.LENGTH_LONG)
.show();
}
});
request.executeAsync();
} else
{
requestPermissions();
}
}
void getUserProfie()
{
// make request to the /me API to get user details
Request.newMeRequest(fSession, new Request.GraphUserCallback()
{
// callback after Graph API response with user
// object
@Override
public void onCompleted(GraphUser user, Response response)
{
if (user != null)
{
// To display facebook user name of the user
text.setText("Hello " + user.getName() + "!");
buttonsEnable();
}
}
}).executeAsync();
}
public void postImage()
{
if (checkPermissions())
{
Bitmap img = BitmapFactory.decodeResource(getResources(),
R.drawable.ic_launcher);
Request uploadRequest = Request.newUploadPhotoRequest(
Session.getActiveSession(), img, new Request.Callback()
{
@Override
public void onCompleted(Response response)
{
Toast.makeText(MainActivity.this,
"Photo uploaded successfully", Toast.LENGTH_LONG)
.show();
}
});
uploadRequest.executeAsync();
} else
{
requestPermissions();
}
}
public void requestPermissions()
{
Session s = Session.getActiveSession();
if (s != null)
s.requestNewPublishPermissions(new Session.NewPermissionsRequest(this,
PERMISSIONS));
}
public boolean checkPermissions()
{
Session s = Session.getActiveSession();
if (s != null)
{
return s.getPermissions().contains("publish_actions");
} else
return false;
}
@Override
public void onSaveInstanceState(Bundle savedState)
{
super.onSaveInstanceState(savedState);
uiHelper.onSaveInstanceState(savedState);
}
@Override
public void onResume()
{
super.onResume();
uiHelper.onResume();
}
@Override
public void onPause()
{
super.onPause();
uiHelper.onPause();
}
@Override
public void onDestroy()
{
super.onDestroy();
uiHelper.onDestroy();
}
void buttonsEnable()
{
loginButton.setEnabled(false);
postStatusButton.setEnabled(true);
postImageButton.setEnabled(true);
}
void buttonsDisable()
{
postStatusButton.setEnabled(false);
postImageButton.setEnabled(false);
loginButton.setEnabled(true);
}
}
ScreenShot: